Forms
If you're using [dpt].forms.seas.ucla.edu, please click here.
How to add a form
- Login to Wordpress
- Create the form:
- Dashboard > Settings > FS Contact Form
- Choose "Add a new form" from "Select a Form" dropdown.
DO NOT choose "Form 1: New Form", this is a sample and must be left alone.
- IMPORTANT: tabs/sections not mentioned here are to have their settings left alone (as default),
so DO NOT CHANGE ANYTHING.
- Basic Settings tab > Basic Settings section:
- In "Form # label:", enter the name of the form.
- In "Welcome instruction:", enter the texts that will be displayed before the
first field on the form. Usually this is the description of the form and/or instruction. Use
the html tags as needed for paragraphs, bold texts, etc. For example, copy and paste
the following html code into the left area at
http://www.w3schools.com/html/tryit.asp?filename=tryhtml_intro, then click
"See Result >>" button to see the result. You can use this site to quickly test html code.
<style>
/* Reduce the line spacing of a paragrah a bit. */
p {line-height: 120%;}
</style>

<p>Lorem ipsum dolor sit amet, consectetur adipiscing elit,
sed do eiusmod tempor incididunt ut labore et dolore magna aliqua.
Ut enim ad minim veniam, quis nostrud exercitation ullamco laboris
nisi ut aliquip ex ea commodo consequat.</p>

<p><b>IMPORTANT:</b> this is an important message.</p>
- "Save Changes" and "Preview Form".
- Basic Settings tab > Email Settings section:
- In "Email To:", enter the email address(es) of the recipient(s) for this
form submission. Use comma to separate multiple email addresses.
- In "Email Subject Prefix:", literally type in "[form_label]", but without the double quotes.
- In "Return-path address (recommended):", leave blank or enter an email address to appear as X-Sender.
- "Save Changes"
- Fields tab > Field Settings section:
- The following fields are pre-created and cannot be deleted, but can be disabled in "Show Details" button.
- Name (don't disable)
- Email (don't disable)
- Subject (can disable)
- Message (can disable)
- Click "Add New Field" button to add a new field:
- In "Label:", enter the title of the field (keep ":" at the end for consistency).
- In "Field Type:", choose the appropriate field type.
- Click "Show Details" button to configure the field:
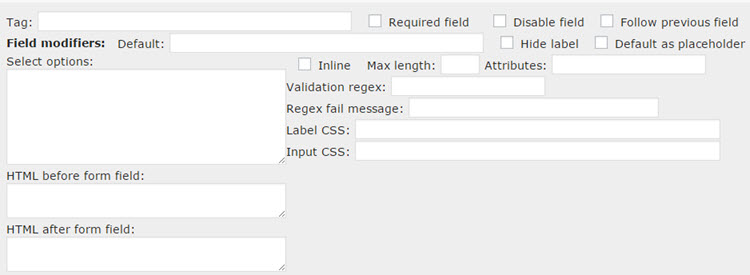
- Click "View instructions for fields" link (at the top) whenever you need
more description on any option in "Show Details" button.
- "Validation regex:" is a powerful feature for validating user inputs.
If you wish to validate user inputs, see the section
"Validating using regular expressions" below.
- If you want to make the filed a CC recipient, please check the section "CC Recipients" below.
- Repeat "Add New Field" button until all the needed fields are added.
- Labels tab > Field Label Settings section:
- Change "Your message has been sent, thank you." to
"Your form has been submitted successfully. You should also receive an email confirmation."
- Security tab > CAPTCHA Settings section:
- Enable reCAPTCHA V2
- If reCAPTCHA V2 Site Key and Secret Key are blank, please contact cms@seas.ucla.edu.
- Advanced tab > Confirmation Email Settings section:
- Check "Enable confirmation email message."
- In the next 4 fields, enter the appropriate email information.
- In "Confirmation email message:", click "help" link (next to it), and then enter
the following texts (no html tags, unless you enable it):
- Enter something like this:
Your xxxx submission has been received. You should receive a call or email follow-up soon.

The following information was submitted:
- You want the user to know what he/she submitted. In the expanded "help" above,
copy the lines in between (but not including) [from_email] and [subject] and paste
them to the confirmation email message. For example:
[Phone-Number]
[Location]
[Room-number]
[Department]
[Recharge-ID]
[Request-details]
- You would want to add a label to each of the values above (i.e. [Phone-Number] will
be replaced with the value entered in the form, so you want to precede this value with
a label). For example, your final confirmation message can look like this:
Your MSR submission has been received. You should receive a call or email follow-up soon.

The following information was submitted:

Phone-Number: [Phone-Number]
Location: [Location]
Room-number: [Room-number]
Department: [Department]
Recharge-ID: [Recharge-ID]
Request-details: [Request-details]
- Advanced tab > Redirect Settings section:
- If you do not need to redirect the user anywhere in particular, uncheck
"Enable redirect after the message sends."
- Advanced tab > Advanced Form Settings section:
- Optionally check "Enable a "Reset" button on the form."
- Advanced tab > Advanced Email Settings section:
- Optionally check "Enable to have the email labels on same line as values.".
If you do not check, you will get an email like this:
Name:
Joe Bruin

If you check, you will get an email like this:
Name: Joe Bruin
- Add the form to a new page:
- Get the shortcode for the form:
- Go to Dashboard > Plugins > FS Contact Form
- Choose the form you are working with from "Select a Form" dropdown.
- Copy the line after the line "Shortcode for this form:"
- Follow the
instruction to add a new page. When the instruction tells you to enter
the page content in the next input box,
paste in the shortcode you copied earlier. For example:
[si-contact-form form='2']
How to delete a form
- Dashboard > Plugins > FS Contact Form
- Choose the form from "Select a Form" dropdown.
- Click Tools tab.
- Click "Delete Form" button (at the bottom).
How to CC recipients
- Dashboard > Plugins > FS Contact Form
- Choose the form from "Select a Form" dropdown.
- Click Fields tab.
- Click "Show Details" on the field that you wish to have the email to be included in CC.
- Set the field's attributes as follow:
- Label: anything
- Field type: email
- Tag: add-to-cc-list
If you set more than one "add-to-cc-list" tags in one form, the tags will be numbered. (add-to-cc-list, add-to-cc-list01, add-to-cclist02...)
If the field is for faculty's email address and you're using the autocomplete feature, the tag needs to be "add-to-cc-list_faculty". Also since the field is filled in automatically, enter readonly="readonly" in Attributes.
- Required field: either
- Save changes.
- [Optional] If you're updating the tags in an existing form, you may want to check whether the changed tags are already in the confirmation email. If they are, we need to update the confirmation email, too.
- Click Advanced tab.
- Update "Confirmation email message" in the "Confirmation Email Settings" section if necessary.
- Save changes.
How to setup autocomplete
Currently, the autocomplete function is available for faculty's name and Recharge ID.
* You can check how it works on dev.seasnet.
- Dashboard > Plugins > FS Contact Form
- Choose the form from "Select a Form" dropdown.
- Click Fields tab.
- Click "Show Details" on the field that you wish to have the autocomplete function.
- Set the field's attributes as follow:
- Label: anything
- Field type: text
- Tag: autocomplete_faculty or autocomplete_rechargeid
- Required field: either
- Save changes.
- [Optional] If you're updating the tags in an existing form, you may want to check whether the changed tags are already in the confirmation email. If they are, we need to update the confirmation email, too.
- Click Advanced tab.
- Update "Confirmation email message" in the "Confirmation Email Settings" section if necessary.
- Save changes.
- [Optional] If you're adding the autocomplete_faculty field, you may want to add the faculty's email address field at the same time. The autocomplete feature fills in the email address automatically and the faculty receives a copy of the email, too. (How to add the faculty's email address)
Validating using regular expressions
The ability to be able to use a regular expression pattern to validate user inputs
gives you almost unlimited ways to validate. There are many regular
expression quick guides, but here is a nice one at
http://regexlib.com/CheatSheet.aspx. If you need a tutorial, try
http://regexone.com
If you want to test your pattern(s) online, check at www.regexpal.com
The following table lists the most common regular expressions that you might find useful.
Note that a regular expression pattern must be enclosed with "/".
| Input type |
Suggested "Validation regex:" |
| phone number with hyphens |
/^[0-9]{3}-[0-9]{3}-[0-9]{4}$/ |
| phone number without a hyphen |
/^[0-9]{3}(?:\-|)[0-9]{3}(?:\-|)[0-9]{4}$/ |
| recharge ID |
/^[a-zA-Z]{2}[a-zA-Z0-9]{2}$/ |
| a UCLA email address |
/[@|\.]ucla\.edu$/ |
|
|
|
|
Updated